Fiasco II Restoration
- fiasco
- Posts: 885
- Joined: Sat Jul 05, 2008 2:10 am
- Your car is a: 1969 Fiat Spider
- Location: Ontario, CA
Fiasco II Restoration
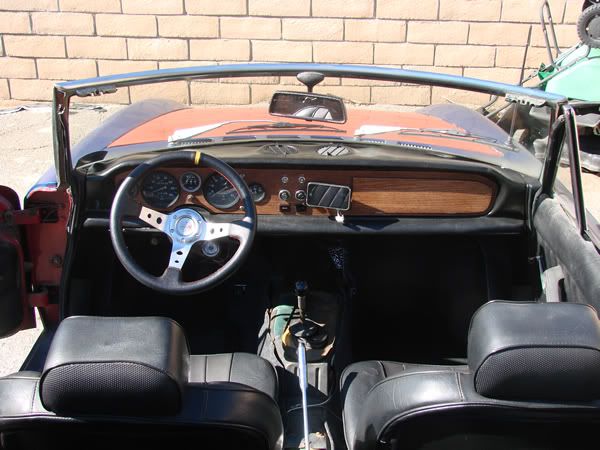
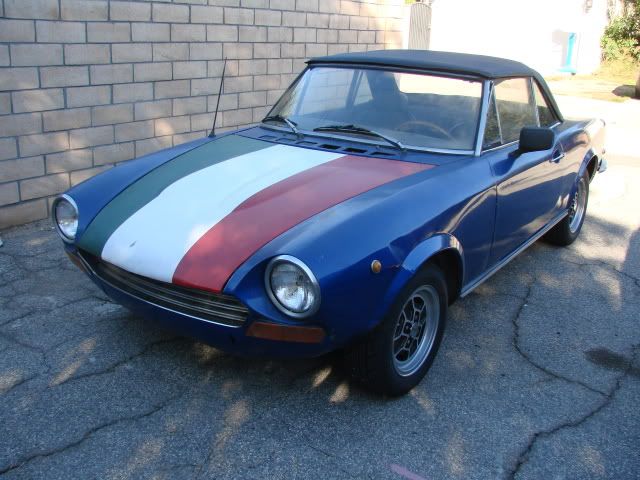
Brought my car home from Mark's today. I'll use this thread to document the various projects I work on and to give an overview of what's happening with the car.
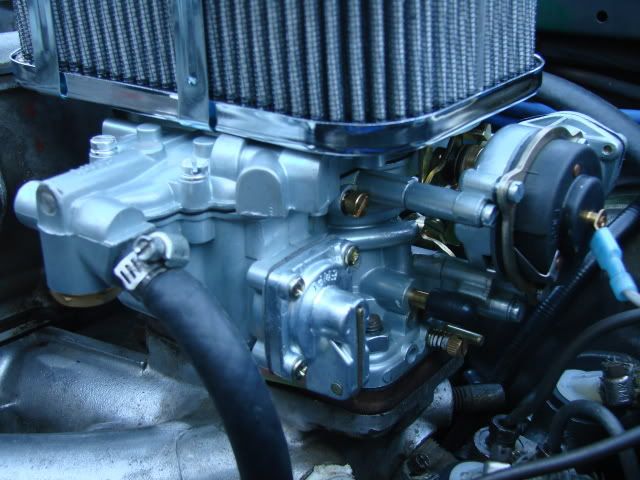
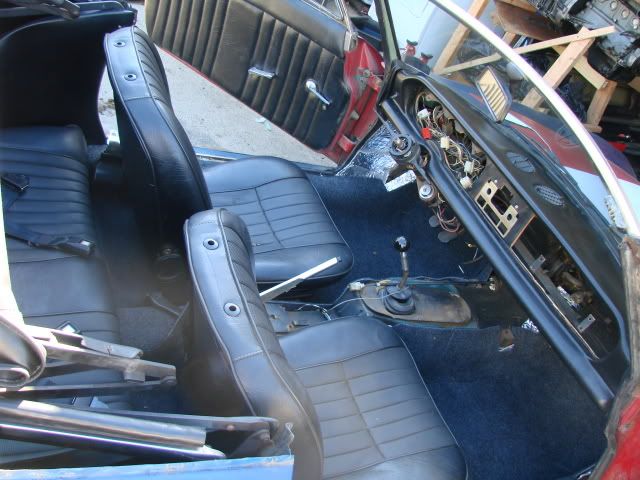
1969 Fiat Spider with 2 liter engine, distributorless ignition, 32/36 DFEV carb and chrome air cleaner, adjustable temp fan switch, fully de-smogged, restored CD16 wheels, new vinyl softtop. I feel good about the mechanicals at this point. Mark has gone through the car and gotten all the basics sorted.
Here's a link to the Photobucket album with the pics I took on arriving home today. I think of these as the "before" pics.
http://s369.photobucket.com/albums/oo13 ... asco%20II/
Things I did this afternoon:
1. Thorough cleaning.
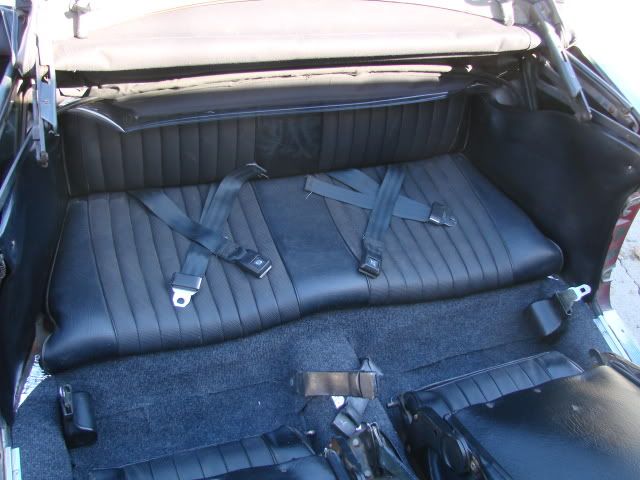
2. Put in rear seat belts for my kids.
3. Replaced steering wheel.
4. Put in my Michigan Shorter Shifter
Immediate plans:
1. Get a gas pedal.
2. Replace the dash with the one from my old car (it's in much better shape). This will include making a new set of wood dash panels.
3. New carpet. I'm going to buy carpet at Home Depot and cut according to pattern.
4. Replace incorrect small bump hood with correct flat hood.
5. New custom center console.
Lots of work ahead, but really happy to be back on the road.
-- se
Steve Eubanks
-----------------------------------------------------------------------------------------------------
1969 Fiat 124 Spider AS | 2108 Fiat 124 Spider Classica | http://calstylestudio.com
-----------------------------------------------------------------------------------------------------
1969 Fiat 124 Spider AS | 2108 Fiat 124 Spider Classica | http://calstylestudio.com
- thechadzone
- Posts: 220
- Joined: Sun Feb 03, 2008 3:31 pm
- Your car is a: 1969 Fiat 124AS Spider
- Location: Eugene, Oregon
Re: Fiasco II Restoration
Nice car! I hope all goes well with its restoration. Your kids must be very small to fit two of them in the rear of the car. Take lots of pics, and post often. Those of us who also own '69 cars will be watching intently...
Re: Fiasco II Restoration
I still think you should keep the paint scheme on the hood .
Rick
Rick
Re: Fiasco II Restoration
Congratulations, Steve. I know you'll do a great job of getting it to look nice, and glad to know that Mark has got the mechanicals straightened out already. Be sure to check out the logistics of fitting the flat hood over the 2 liter engine. I know that it's been done many times before, but there will be some tight clearances and possible modifications required. Looking forward to seeing you out on the road again!
Alvon
Alvon
Carb Linkage Photo wanted
fiasco,
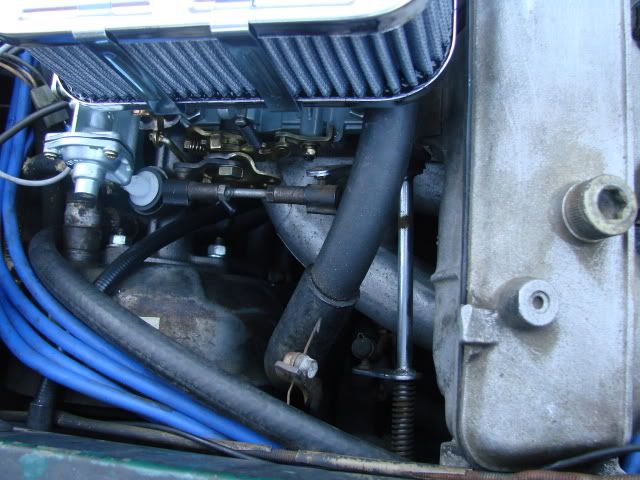
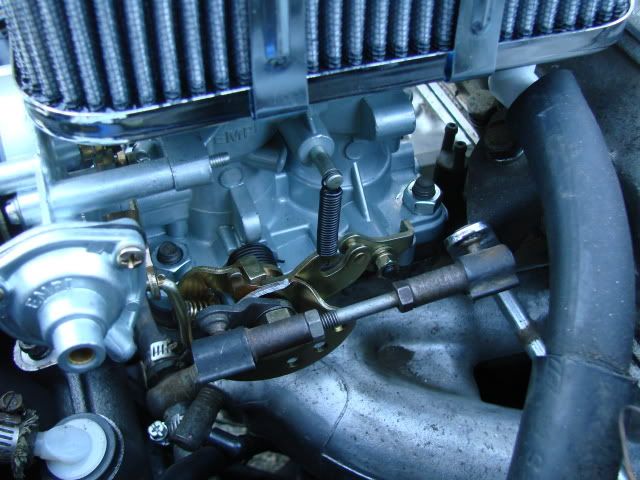
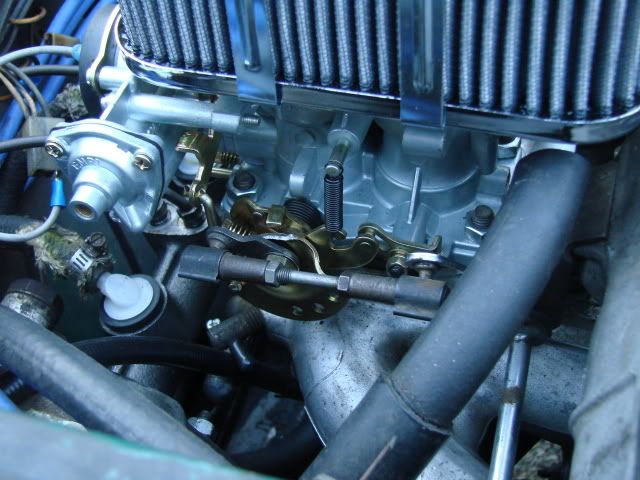
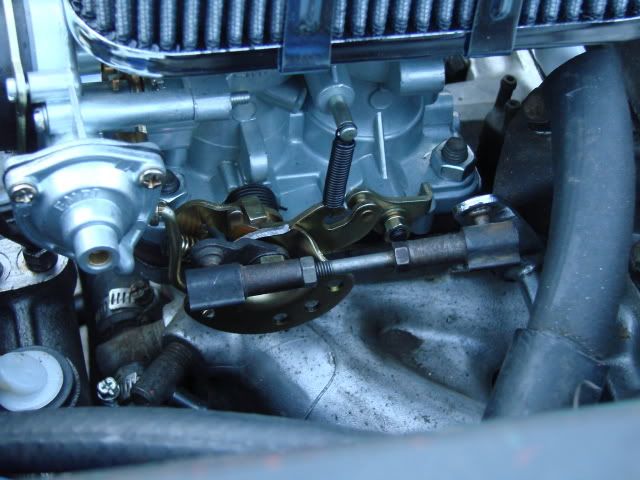
Can you take a photo of how the carb linkage is mounted at the carb? I'm trying to help a fellow fiat owner setup his spider with the same carb as yours.
Thanks,
Ralph
Can you take a photo of how the carb linkage is mounted at the carb? I'm trying to help a fellow fiat owner setup his spider with the same carb as yours.
Thanks,
Ralph
- fiasco
- Posts: 885
- Joined: Sat Jul 05, 2008 2:10 am
- Your car is a: 1969 Fiat Spider
- Location: Ontario, CA
Re: Fiasco II Restoration
Thanks Alvon. I think I'm in good shape for flat hood fitment. The distributorless ignition has taken the dist out of the picture, and Mark had a car at the shop with a similar setup and a flat hood. I'll hold on to the bumpy one till I'm sure though.ventura ace wrote: Be sure to check out the logistics of fitting the flat hood over the 2 liter engine.
Ralph - I'll try to get some pics tonight, if I can get to it before it gets dark.lanciahf wrote:Can you take a photo of how the carb linkage is mounted at the carb?
-- se
Steve Eubanks
-----------------------------------------------------------------------------------------------------
1969 Fiat 124 Spider AS | 2108 Fiat 124 Spider Classica | http://calstylestudio.com
-----------------------------------------------------------------------------------------------------
1969 Fiat 124 Spider AS | 2108 Fiat 124 Spider Classica | http://calstylestudio.com
- fiasco
- Posts: 885
- Joined: Sat Jul 05, 2008 2:10 am
- Your car is a: 1969 Fiat Spider
- Location: Ontario, CA
Re: Fiasco II Restoration
Ralph,
Here's some pics of the linkage.
-- se
Here's some pics of the linkage.
-- se
Steve Eubanks
-----------------------------------------------------------------------------------------------------
1969 Fiat 124 Spider AS | 2108 Fiat 124 Spider Classica | http://calstylestudio.com
-----------------------------------------------------------------------------------------------------
1969 Fiat 124 Spider AS | 2108 Fiat 124 Spider Classica | http://calstylestudio.com
- fiasco
- Posts: 885
- Joined: Sat Jul 05, 2008 2:10 am
- Your car is a: 1969 Fiat Spider
- Location: Ontario, CA
Re: Fiasco II Restoration
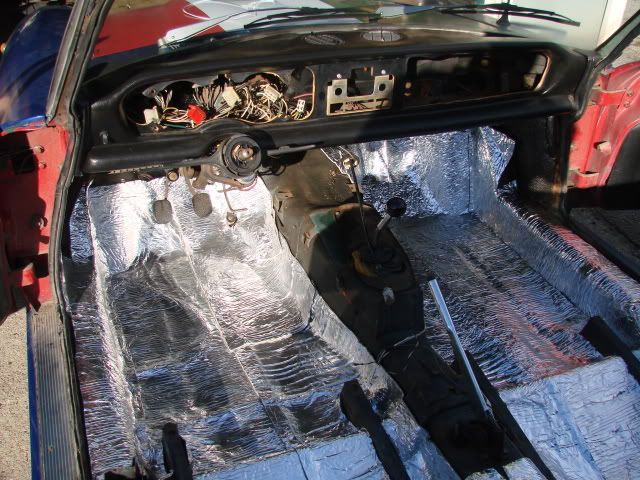
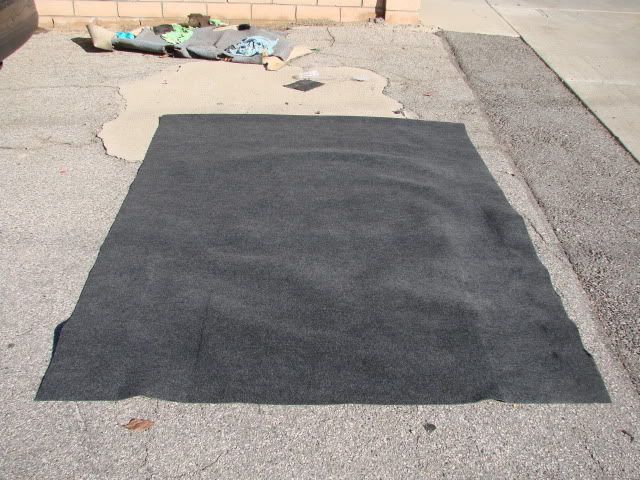
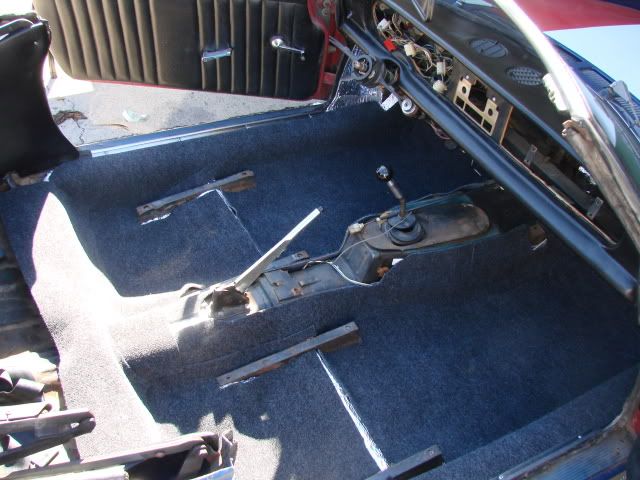
Here are some pics of the latest work. I put new carpet in on Wednesday, as well as new side panels in the back.
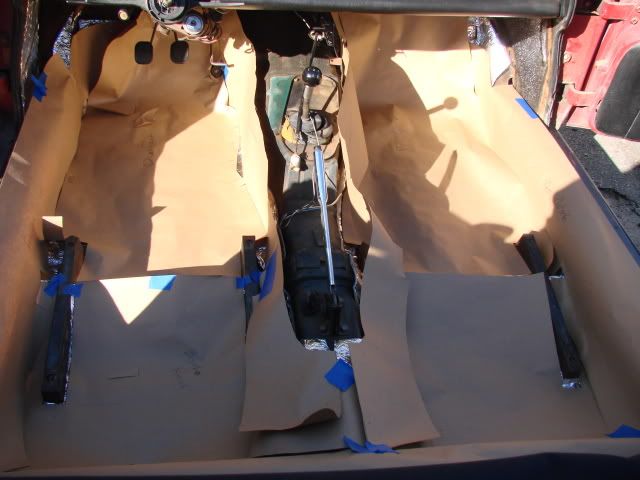
I started with self-adhesive duct-insulation. It didn't really stick all that well, but in those places where it had to stick to something vertical, I supplemented the stick factor with some spray adhesive. Worked great.
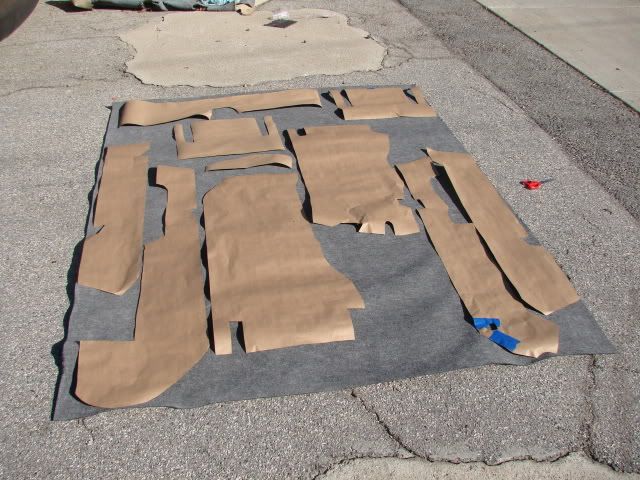
I bought an inexpensive 6 x 8 indoor-outdoor carpet at Lowes, and made templates from Rick's drawings (http://www.fiatspider.com/f08/viewtopic ... dimensions).
The carpet went right in.
Put in replacement (from Fiasco I) rear panels and reinstalled the seats.
Took me about 4 hours to do the whole project, and I am really happy with the results. The carpet was cheap, so it may not be too long before I have to do it again, but I learned some things, and if this carpet ends up only lasting one year, then I'll still feel that was $20 well spent. Next time around I'll buy more expensive carpet, and will be able to do a more refined job of installation. It is amazing how much more pleasant it is to drive the car now with the cleaner look of the carpet and the significant reduction of road noise.
There are a bunch more pics - if you want to look at them, here's the photobucket link:
http://s369.photobucket.com/albums/oo13 ... asco%20II/
-- se
Steve Eubanks
-----------------------------------------------------------------------------------------------------
1969 Fiat 124 Spider AS | 2108 Fiat 124 Spider Classica | http://calstylestudio.com
-----------------------------------------------------------------------------------------------------
1969 Fiat 124 Spider AS | 2108 Fiat 124 Spider Classica | http://calstylestudio.com
- fiasco
- Posts: 885
- Joined: Sat Jul 05, 2008 2:10 am
- Your car is a: 1969 Fiat Spider
- Location: Ontario, CA
Re: Fiasco II Restoration
Forgot to mention that halg stopped by just as I was finishing the carpet. I only regret that I wasn't on track to take on any more work that day where I could have taken advantage of Hal's great expertise. Thanks for coming by and hanging out for a bit Hal - sorry I couldn't chat longer.
-- se
-- se
Steve Eubanks
-----------------------------------------------------------------------------------------------------
1969 Fiat 124 Spider AS | 2108 Fiat 124 Spider Classica | http://calstylestudio.com
-----------------------------------------------------------------------------------------------------
1969 Fiat 124 Spider AS | 2108 Fiat 124 Spider Classica | http://calstylestudio.com
- courtenay
- Patron 2020
- Posts: 1321
- Joined: Mon Nov 30, 2009 11:41 pm
- Your car is a: 1980 Spider 2000
- Location: Courtenay, BC, Canada
Re: Fiasco II Restoration
What was the silver stuff and the tan colored stuff you used under the carpet?? My carpet is in pretty good shape, but a PO has taken out all the under carpet stuff. As a result, it's pretty noisy to drive, and the carpet doesn't fit all that well. One of my winter projects is to take the seats out and redo the under carpet stuff. BTW - isn't "stuff" a great word...it covers so much....well...stuff...
Bruce Shearer
'80 Spider Fi
'10 Volvo XC70
'06 GMC 1 Ton PU
'72 Spider a long, long time ago
'80 Spider Fi
'10 Volvo XC70
'06 GMC 1 Ton PU
'72 Spider a long, long time ago
- fiasco
- Posts: 885
- Joined: Sat Jul 05, 2008 2:10 am
- Your car is a: 1969 Fiat Spider
- Location: Ontario, CA
Re: Fiasco II Restoration
The silver stuff is the self-adhesive duct insulation. Found it at Lowes by the water heater accessories.
http://www.lowes.com/pd_28929-1410-FV51 ... insulation
The tan stuff is the paper templates that I laid in the car and trimmed to make sure they were just right before I used them as guides to cut the carpet.
http://www.lowes.com/pd_28929-1410-FV51 ... insulation
The tan stuff is the paper templates that I laid in the car and trimmed to make sure they were just right before I used them as guides to cut the carpet.
Steve Eubanks
-----------------------------------------------------------------------------------------------------
1969 Fiat 124 Spider AS | 2108 Fiat 124 Spider Classica | http://calstylestudio.com
-----------------------------------------------------------------------------------------------------
1969 Fiat 124 Spider AS | 2108 Fiat 124 Spider Classica | http://calstylestudio.com
- Zippy
- Posts: 585
- Joined: Mon May 25, 2009 10:06 pm
- Your car is a: 1978 Fiat
- Location: Real Close to Milton, WA
Re: Fiasco II Restoration
Is you shift boot cut? I hope you are going to replace it before you put the cover back on. The guy that replaced the clutch in my 69 coupe back in the 70s cut mine and didn't tell me. I noticed it was a lot noisier than before. He denied cutting it and said it was like that. I was POed. The Fiat plant was on strike back then and I couldn't get a replacement. I tried patching it with rubber cement and an inner tube but it kept coming apart. I finally gave up and learned to live with the extra noise, but it really bothered me.
Bye the way, I like your carpet. Is that the felt like texture?
1978 Spider
- fiasco
- Posts: 885
- Joined: Sat Jul 05, 2008 2:10 am
- Your car is a: 1969 Fiat Spider
- Location: Ontario, CA
Re: Fiasco II Restoration
It is cut. I haven't tried to source a replacement yet. I'm working on dash now, and when I'm done with that will start on a custom center console. I definitely get noise from that spot and am looking forward to cleaning that up.
-- Edit -- Looks like Vick's has 'em for $11.
-- se
-- Edit -- Looks like Vick's has 'em for $11.
-- se
Steve Eubanks
-----------------------------------------------------------------------------------------------------
1969 Fiat 124 Spider AS | 2108 Fiat 124 Spider Classica | http://calstylestudio.com
-----------------------------------------------------------------------------------------------------
1969 Fiat 124 Spider AS | 2108 Fiat 124 Spider Classica | http://calstylestudio.com
- fiasco
- Posts: 885
- Joined: Sat Jul 05, 2008 2:10 am
- Your car is a: 1969 Fiat Spider
- Location: Ontario, CA
Re: Fiasco II Restoration 11/13 Update
Finished the dash today, so I though I would post the pics of the process.
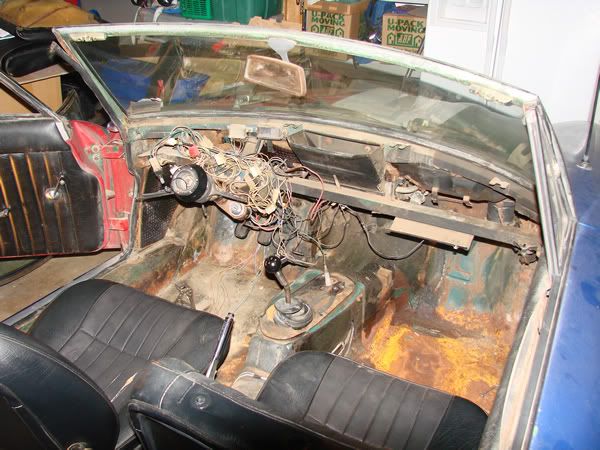
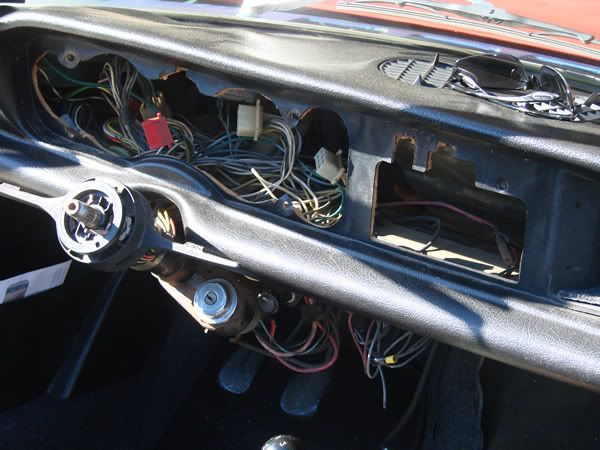
Here's what I started with. This is actually an old pic with everything pulled out - before I did the carpet.
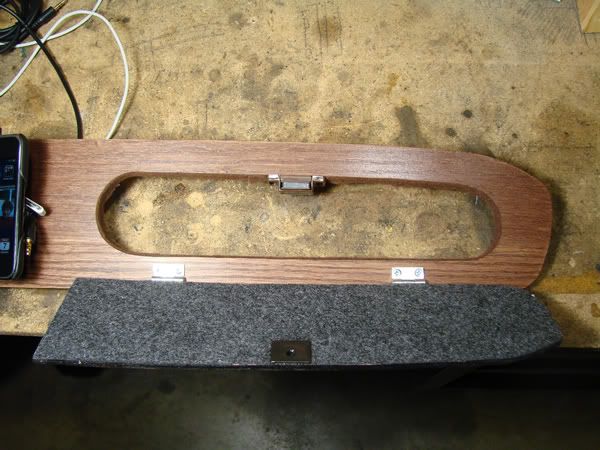
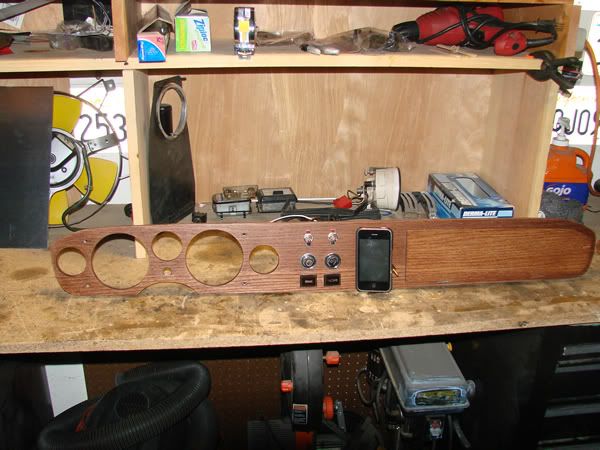
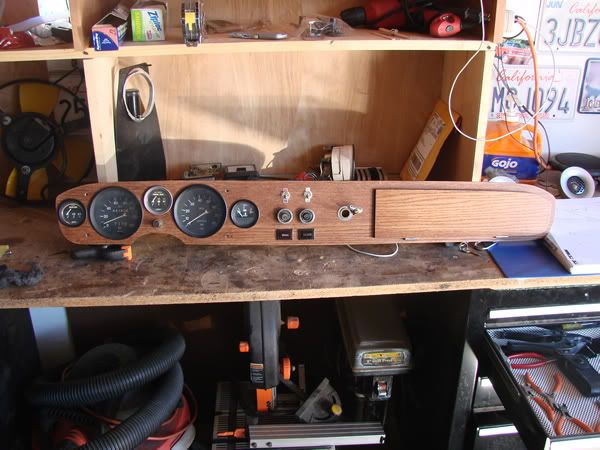
I made a one-piece dash this time. In the past I've generally not been a big fan of the one piece dash, mostly because the ones I've seen look pretty blank in the midsection. However, I've also been generally unhappy with the three-piece dash panels that I've made because I can never get them to line up correctly, resulting in a bit of a haphazard look when I put them all in. So I compromised with myself and built a one-piece and tried to balance the design left, middle and right. The pieces are here.
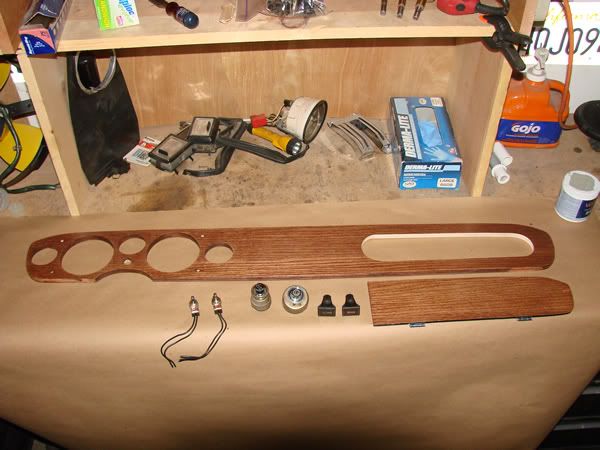
You'll also see that I was a little creative with the design of the glove box. I'm sure some will not like the result, as it is very non-originale, but I'm happy with the look and the function. I'm going to look for a badge of some kind to go on the front of the door to alleviate some of the plain-ness. I think it needs something else on that end for balance.
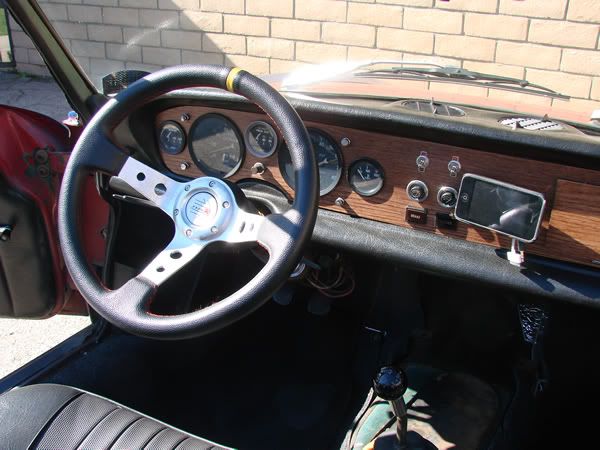
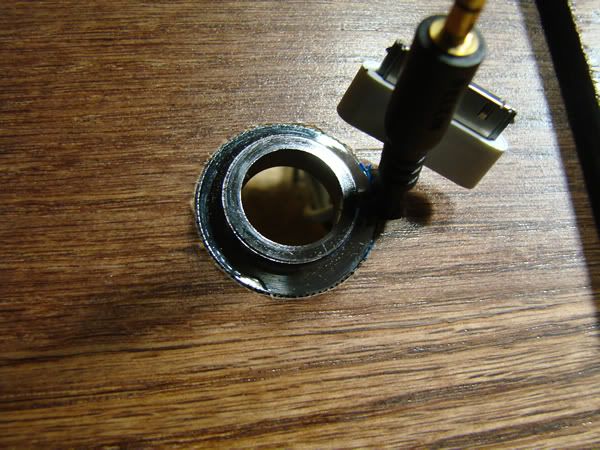
Here I have installed the center section controls and phone mount. The phone thing is very "me". I'm a gadget guy and love to use the maps and such on my phone. The mount includes a charging cable and audio cable that pull out from behind the phone. That way I can plug the phone into the stereo easily for ipod or Pandora use on the road. (No, I do not text while driving. Only use the phone if I have a headphone on.)
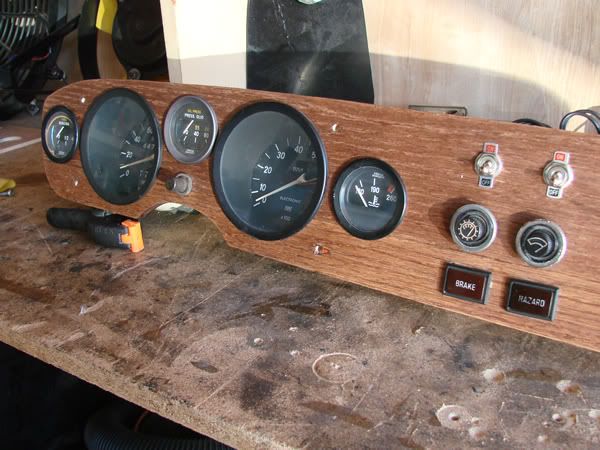
Close up of the center section. Left switch is for heater fan. Right switch is for hazard lights.
Phone mount is made from plumbing parts.
Assembled with gauges.
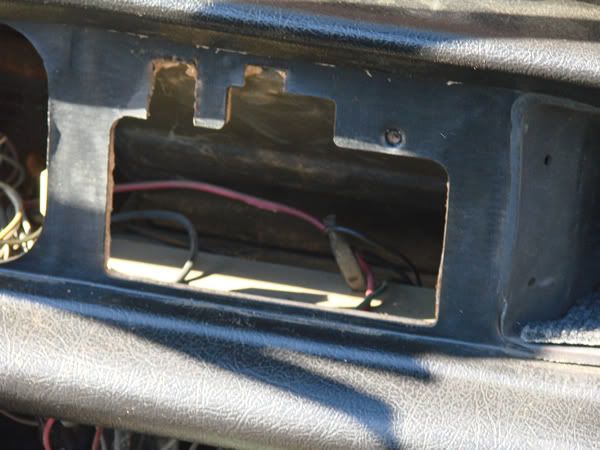
I had to modify the center section of the dash to accept the alternate placement of the controls in the center section. Yes, I am now "that guy" that cut up the center section of his dash. If it's any help, I plan to keep this car till the end of time, so at least I'll never be that "idiot PO that cut up the center of his dash". Or at least that's the plan.
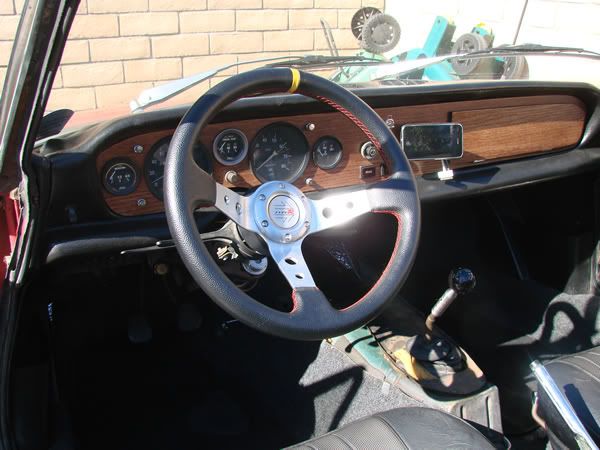
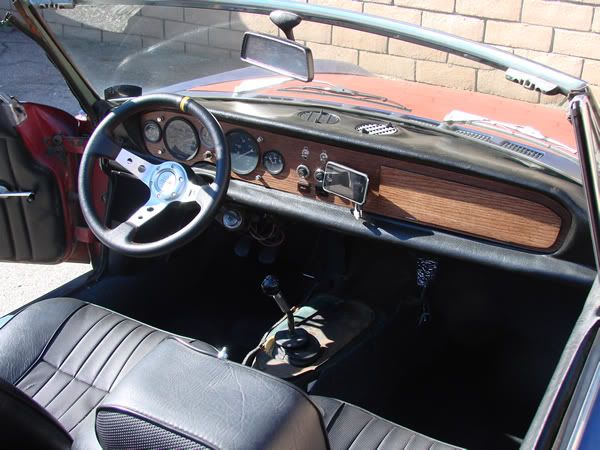
Final complete pictures. The final install also included replacing the speedo cable - a process that went smooth as silk.
Here's what I started with. This is actually an old pic with everything pulled out - before I did the carpet.
I made a one-piece dash this time. In the past I've generally not been a big fan of the one piece dash, mostly because the ones I've seen look pretty blank in the midsection. However, I've also been generally unhappy with the three-piece dash panels that I've made because I can never get them to line up correctly, resulting in a bit of a haphazard look when I put them all in. So I compromised with myself and built a one-piece and tried to balance the design left, middle and right. The pieces are here.
You'll also see that I was a little creative with the design of the glove box. I'm sure some will not like the result, as it is very non-originale, but I'm happy with the look and the function. I'm going to look for a badge of some kind to go on the front of the door to alleviate some of the plain-ness. I think it needs something else on that end for balance.
Here I have installed the center section controls and phone mount. The phone thing is very "me". I'm a gadget guy and love to use the maps and such on my phone. The mount includes a charging cable and audio cable that pull out from behind the phone. That way I can plug the phone into the stereo easily for ipod or Pandora use on the road. (No, I do not text while driving. Only use the phone if I have a headphone on.)
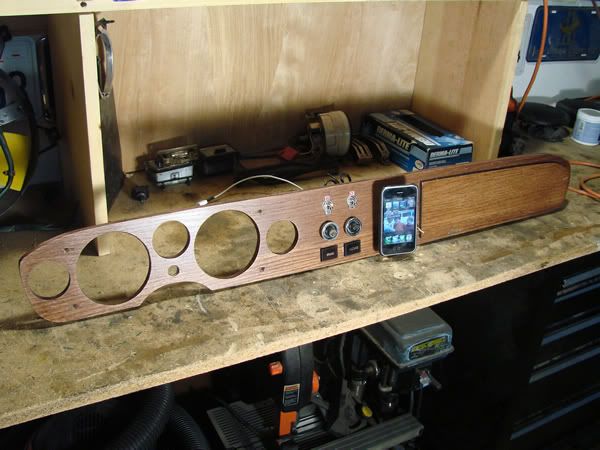
Close up of the center section. Left switch is for heater fan. Right switch is for hazard lights.
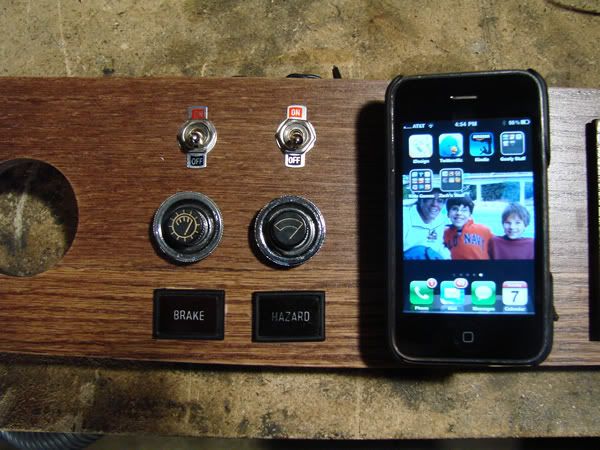
Phone mount is made from plumbing parts.
Assembled with gauges.
I had to modify the center section of the dash to accept the alternate placement of the controls in the center section. Yes, I am now "that guy" that cut up the center section of his dash. If it's any help, I plan to keep this car till the end of time, so at least I'll never be that "idiot PO that cut up the center of his dash". Or at least that's the plan.
Final complete pictures. The final install also included replacing the speedo cable - a process that went smooth as silk.
Steve Eubanks
-----------------------------------------------------------------------------------------------------
1969 Fiat 124 Spider AS | 2108 Fiat 124 Spider Classica | http://calstylestudio.com
-----------------------------------------------------------------------------------------------------
1969 Fiat 124 Spider AS | 2108 Fiat 124 Spider Classica | http://calstylestudio.com