First, a little about me. With the exception of a Miata (oh the shame!) and a VW Bug that I owned many years ago, none of my cars were anything but gently used, mostly reliable cars for practical transportation. I have no formal mechanical training, but I’m handy with a wrench, am competent working with wood, and enjoy working with my hands. I do all house projects by myself, but in the past, I always left car issues to a mechanic. I initially took my Spider to a local mechanic but shortly afterwards, I realized it is simple enough that I can do most of the work myself (as long as I have a team of internet experts to offer their experience and advice).
A special thanks to the following forum members that have helped me along the way: mark, csaba, azruss, spidernut, kmac33, rroller123, seabeelt, bradartigue, giuliot60, westy64, majicwrench, and njfiat1981. Apologies if I left anyone out.
Another thanks to the various forum members that bought my stock parts, helping to offset some of my customization costs.
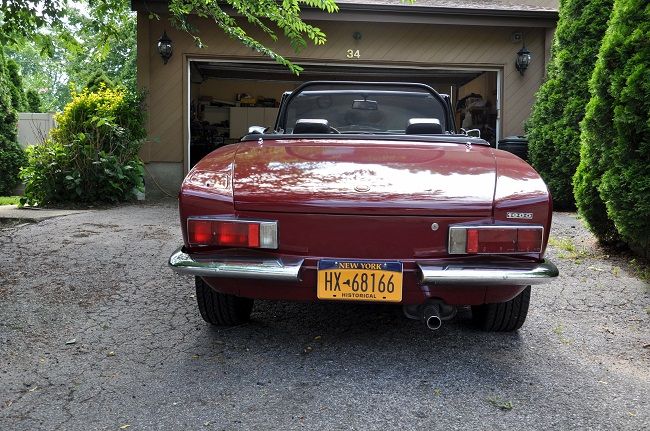
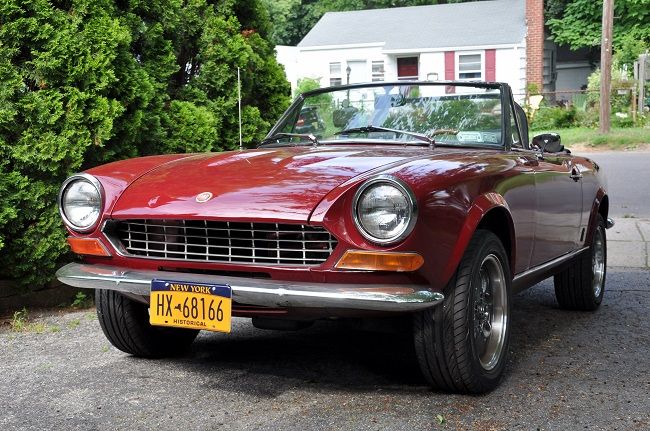
Now, onto the car. I bought my 1975 spider last summer. The Piccolo Ferrari (as my wife calls it) had recently been restored, but it had a bunch of minor issues. The interior of the car was in mostly stock condition. The exterior had been customized with lights and bumpers to make it look like an earlier car, which I like.
Before starting the customizations, I set out the following set of goals:
1. Resolve some nagging issues with the car including electrical gremlins (hey, it’s a FIAT), radiator fan, carburetor, and a strong fuel smell
2. Enhance the car’s handling
3. Enhance the car’s safety
4. Enhance the comfort / ergonomics for the driver (me)
5. Enhance the sound system (but not go overboard)
6. Enhance the appearance of the car. On the outside, I wanted the wheels and tires to look (and be) more modern. Inside, I wanted to upgrade the dashboard. The stock dashboard has always looked like an abomination to me, with the gauges clustered too closely together on the left, and a center section of idiot lights that looks like a cheap, plastic after-thought. I know others will differ, but that’s my opinion.
So, here is a list of things I did to my car:
Nagging Issues
- Replaced stock alternator with 95 amp alternator
- Re-wired radiator fan connections
- Re-ground battery
- Re-ground left rear tail-light connections
- Adjusted carburetor
- Replaced missing light bulbs in dash and trunk
- Replaced fuel fill hose
- Replaced inner shift boot
Handling
- Installed beefed-up front sway bar
- Installed rear sway bar
- Installed new shocks
Safety
- Installed new rotors and brake lines, and rebuilt calipers
- Installed rear lap seat belts for occasional, short rides with the kiddies (ages 6 and 7) into town
- Installed front passenger 3-point seat belts. This required getting retractor brackets from a donor car and having them welded behind the back seat because in 1975, Spiders didn’t come with the brackets. It also required getting a rear seat-back with cutouts for the retractors and dyeing the seat black to match the other seats. For me, simple lap belts in the front didn’t cut it. Strange, because when I learned to drive, seat belts weren’t even mandatory. Now, I don’t feel safe unless they are 3 point belts.
- Installed Headlight Relay Kit as well as Halogen headlights
- Installed passenger side-view mirror
Ergonomics
- Replaced the stock steering wheel . It was thin and the angle was annoying, so I replaced it with a beautiful, gently used Nardi mahogany wheel that set the theme for the dashboard and interior customizations. I also adjusted the angle by dropping the steering column down with the help of some strategically placed washers.
- Shortened the shifter by installing a Michigan Short Shifter. It was still a bit too high, so I cut down the underlying shifter by another 1/2 an inch.
- Replaced the shift knob. I couldn’t stand the knob spinning in my hand. Also, it was too small for my hand, so I replaced it with something more functional and (I think) classy.
- Added a Miata windscreen and Spidernut’s custom brackets, which dramatically reduce wind buffeting at speed.
Exterior Aesthetics
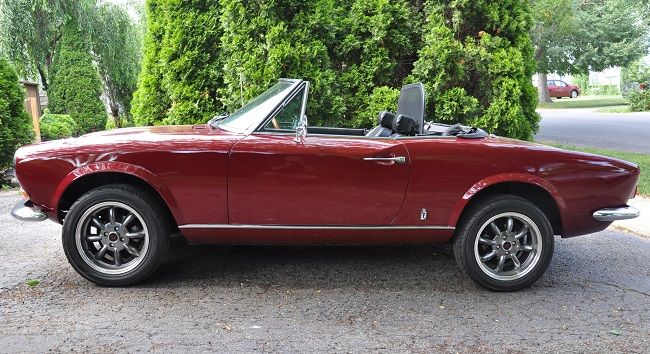
- Replaced the wheels with a set from Allison’s automotive and sprang for a new set of tires.
- Added a stainless steel tip to the exhaust. Cutting it down to make it fit without destroying it at the same time it was humbling.
Interior Aesthetics
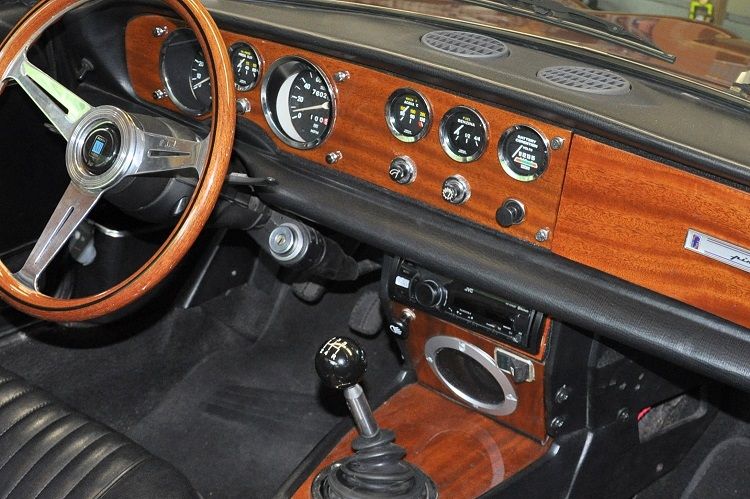
- Created a custom, two piece dash from mahogany and stained it to match the steering wheel. After trying unsuccessfully to have the pieces clear-coated by a local auto body shop, I sanded them back down to bare wood, re-stained them and laid down 12 coats of Epifanes varnish to get the look (and UV protection) I wanted. The particular varnish I used does not require sanding between coats, but I became well acquainted with 800 grit sandpaper as I sanded off every individual piece of dust that dried on the wood between every coat. I used what is normally the center section of the dash to relocate some of the gauges, switches, and the cigarette lighter. This required extending over 20 wires (because they were too short) and re-molding the heater-box behind the dash (with a heat gun) so the gauges would fit. I also switched the location of the Tach and Speedo because I like them better with the Tach on the left. I also replaced the non-functioning clock with a Veglia Borletti Voltmeter from eBay.
- Replaced the black, plastic instrument bezels with chromed bezels. The chrome bezels really pop against the mahogany dash. If you’re interested, there is a detailed post about it on the forum.
- Built a customized radio console that matches the dash / steering wheel by keeping the black side sections of the stock radio console and creating a new front panel. The panel houses a new, 3.5” speaker, which sits inside a speaker box I hollowed out from a small section of a 4x4 post. The speaker is angled upwards toward the driver. Two existing speakers continue to reside in the map pocket foot wells. I didn’t want to go crazy with the sound system by installing an amp, cutting additional holes, or having to rip up the carpeting to run wires
- Built customized trim pieces for the lower console to carry the mahogany theme towards the back of the car. The pieces are held on with very thin Velcro so they can be removed if necessary.
- Removed the glove box lock and installed a magnetic catch. I don’t keep anything of value in there and anyone who wants to break into the glove box can now do so without breaking anything. I think it looks nicer without the lock but it was a very big empty canvas, so I added a PininFarina emblem, which I think looks nice and honors the design house.
- Upgraded the stereo to a modern, Mechless unit that is Bluetooth / Pandora enabled. Mechless units are shorter than standard units because they do not have CD drives and are a better fit for the stock space in our spiders. I contemplated the new, old-looking radios, but they did not receive great reviews for their sound quality. While upgrading the radio, I discovered bad speaker wiring for one of the existing speakers and a bad radio antenna, both of which I replaced.
- Replaced the stock defroster vents (the ones with the “wings”) for those used in later year cars (without the wings). I think this gives the top of the dash a cleaner look.
- Replaced the exterior shift boot and retaining ring with new ones from an MG (oh, the horror!). If you’re interested, there is a detailed post about it on the forum.
- Deleted the map light (it was useless and I had no space for it), the Ideogram Illumination Intensity Adjustment Potentiometer (there’s a great name for a switch, if there ever was one. It’s set to full brightness all the time anyway and I had no space for it), and the front ashtray (I have no use for it and I think it ruins the lines of the lower console because it sticks up so high. If I suddenly develop a desire to begin smoking, the rear ash tray will have to suffice.)
- Added a faux light switch to the radio console and connected it to the fuel pump. I also removed the “Light” sign around the stock light switch, which makes it blend into the dash. So now, the regular light switch is still the light switch (but it’s hard for a thief to see, unless he knows it’s there) and the faux light switch on the radio console activates the fuel pump. Without the fuel pump on, the car may start, but it’s not going more than 50 feet. It’s not the best anti-theft device, but if it defeats at least one would-be thief it will have served its purpose. It’s already defeated me a few times and I KNOW it’s there.
All-in-all, I’m very happy with the results and think I met all of my initial goals. The nagging problems are gone. The radio sounds great (even at speed). The car handles better, is safer than before, and I feel more comfortable driving it.
I think matching the dash, radio console, and lower console to the mahogany steering wheel, as well as changing to chrome instrument bezels and moving the dash gauges around makes the interior look much classier than before. And others seem to agree. Before, people would comment on the exterior of the car but didn’t comment much on the interior. Now, when they check out the interior, they say “Wow! That’s beautiful”.
It was especially gratifying to see my vision for the dash come to life after so many hours slaving over the individual components. At one point, my wife asked me what I was doing in the garage and I told her “Overcoming challenges one at a time”, which seemed to be the theme for the dash project. When the dash was pulled apart and wires were hanging everywhere, I don’t think my family or neighbors had much confidence that I would get it all back together and working properly. Or that I would do a professional job with the wood. Their surprise is satisfying, but I was confident I could do it.
I still need to:
- Cut the springs to lower the car slightly (it sits a little too high with the new tires/wheels/shocks)
- Make a wood shift knob that matches the dash/wheel
On to the "pictures-or-it-didn’t-happen" proof…
Before picture of the interior
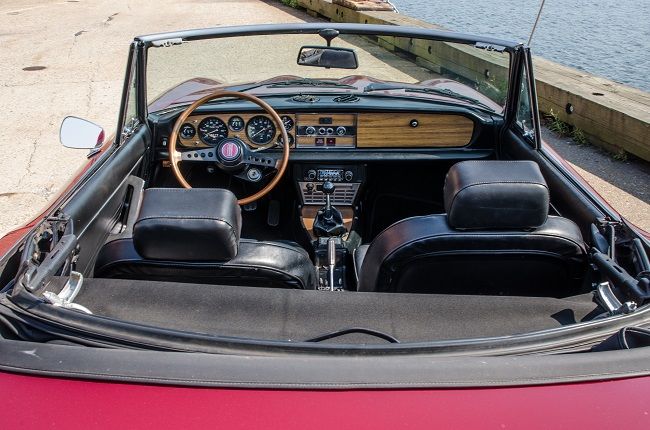
After picture of the interior
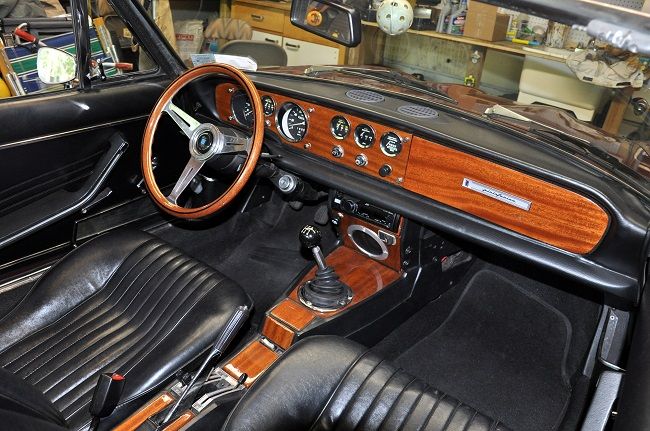
Dash / Radio Console Closeup
Side View
Front View
Rear View
